
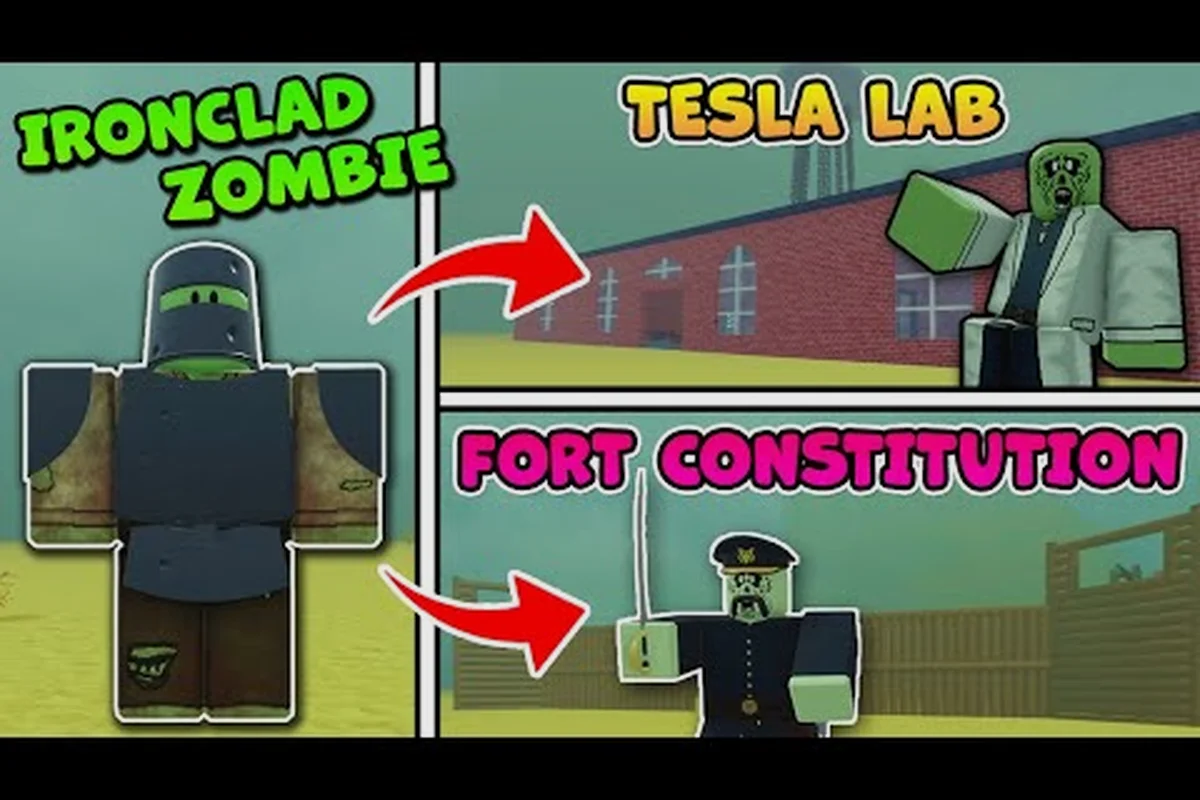
The dead rails ironclad zombie is one of the toughest undead opponents to handle because its protection turns ordinary shots into a slow grind. Understanding its armor, behavior, and reliable counters can save ammunition, reduce ambush damage, and keep a train moving through hostile territory.
Dead Rails Ironclad Zombie: What Makes It Different
The Ironclad Zombie stands apart from standard undead because it arrives with substantial protective equipment rather than relying on health alone. The defining feature is its layered defense: the armor intercepts damage before the body can take the full hit, so a weapon that works against an unarmored target may perform much worse here.
That distinction matters during the dangerous overnight period. Community field notes indicate that hostiles begin appearing around 11 PM and cease activity near 5 AM, while full moons and blood moons can introduce more specialized enemies. An Ironclad Zombie encountered during one of these windows is more than a standard enemy because it can punish players who fire without considering cover, ammunition, or escape routes.
Key facts at a glance
-
Ironclad protection reduces the usefulness of low-powered or poorly placed attacks.
-
Night pressure can increase the number of enemies arriving around the train.
-
Rail ammunition is limited, making every shot against the armor relevant.
-
Fortified positions offer a major defensive advantage over fighting in open desert.
-
Specialized undead may appear alongside the Ironclad Zombie during unusual moon conditions.
| Threat factor | What players should know | Practical response |
|---|---|---|
| Heavy protective gear | Shots can be absorbed before reaching the enemy | Aim for exposed areas or use a high-power weapon |
| Night arrival | Hostiles are active from roughly 11 PM to 5 AM | Fortify the train and assign guards |
| Limited ammunition | Repeated misses waste scarce resources | Carry a backup weapon and avoid blind firing |
| Special moon events | Full moons and blood moons can alter the enemy mix | Scout before leaving a secure location |
| Open terrain | Retreat space and cover are limited | Fight from a carriage, fort, or defensible route |
A useful reference for the surrounding enemy roster is the Dead Rails enemies overview. It helps distinguish the Ironclad Zombie from slower standard zombies, fast variants, outlaws, and other nighttime threats without treating every hostile as if it uses the same counters.
Why armor changes the fight
The Ironclad Zombie is not merely a high-health zombie with a larger model. Its equipment changes the value of each attack. A small-caliber firearm may spend a valuable round without producing a satisfying result, while a heavier weapon or a precise hit can remove the opponent much more efficiently.
This distinction creates a practical lesson: weapon selection matters more than attack speed. Swapping from a weak firearm to a heavier option can be better than standing still and emptying a magazine into an armored target. The same principle applies to melee attacks, because attacks directed at protected sections may deliver less useful damage than attacks aimed at exposed anatomy.
Dead Rails Ironclad Zombie Armor and Weaknesses
The exact armor penetration values for the Dead Rails Ironclad Zombie are not included in the available community data, so assigning a precise damage reduction percentage would create false confidence. What players can safely conclude is that its gear meaningfully reduces the effectiveness of standard attacks, particularly when the target is moving, partially concealed, or surrounded by other enemies.
The safest tactical description is therefore qualitative: normal damage becomes less dependable against the armor, while stronger weapons and deliberate targeting provide the best route to a quick defeat. This also explains why a player may overcome a standard zombie in one burst yet need several careful bursts against the armored version.
Damage priorities compared across undead variants
| Opponent | Main defensive feature | Damage concern | Best general approach |
|---|---|---|---|
| Standard zombie | Basic toughness and numbers | Low health, but swarms create danger | Group control and quick targeting |
| Ironclad Zombie | Protective armor and slow advance | Ammo can be spent with little effect | Heavy firepower and exposed-target shots |
| Fast zombie | High movement speed | Harder to line up a shot | Interrupt its approach and use precision |
| Armed zombie | A usable firearm | Adds ranged pressure at distance | Break line of sight or close the gap safely |
| Skeleton | Fragile frame and quick attacks | Low durability | Prioritize an immediate takedown |
The comparison shows that the Ironclad Zombie is less about raw speed and more about damage efficiency. It gives the player time to keep shooting while the zombie closes distance, turning the encounter into a race between ammunition management and physical danger. This is why a poorly chosen fight can become far more costly than a routine one.
Exposed targets and weapon choice
Community gameplay references show that different enemy families demand different tools, including rifles for precision, shotguns for close-range pressure, and special weapons for supernatural variants. That principle applies directly to the Ironclad Zombie: use a weapon that can deliver meaningful damage rather than a gun selected only because it is already equipped.
Target priority should be the first consideration. Look for a head, hands, neck, or other visible area not covered by the armor. If no opening is visible, create one by positioning the train, a fort wall, or another piece of cover between you and the enemy.
Weapon power is the second consideration. A high-powered option is valuable because each successful shot matters more, although the best result still comes from combining power with accurate aim. Ammunition reserve is the third: a heavy weapon is not a complete solution if the next magazine is empty.
Recommended counter order
-
Create distance and cover before firing.
-
Identify an exposed body area rather than hitting the center of the armor.
-
Use the strongest reliable weapon available without wasting ammunition.
-
Reserve a secondary weapon for emergencies.
-
Retreat to the train or a fort if several enemies close in.
The important weakness is therefore not a single magical body part reported by players. It is the combination of slow approach, exposed movement animations, and damage concentrated through precise attacks. An armored zombie may survive a careless volley, but it cannot make a sloppy player invulnerable while crossing open ground.
Dead Rails Ironclad Zombie Compared With Other Undead
Players often describe several undead-looking enemies by one broad label, yet their equipment and combat behavior differ sharply. The armed zombie carries a firearm and creates ranged danger, the miner zombie fits the industrial visual theme, the scientist zombie has a distinct laboratory appearance, and the banker zombie has its own formal look. These appearances should not be confused with the Ironclad Zombie’s specific armored profile.
| Zombie type | Visual or behavioral distinction | Why players notice it | Main threat |
|---|---|---|---|
| Ironclad Zombie | Prominent protective equipment | Ordinary hits feel inefficient | Armored damage and durability |
| Armed zombie | Carries a gun | It can attack from beyond easy melee range | Ranged pressure |
| Miner zombie | Industrial mining appearance | Distinct silhouette and role | Close-range resistance |
| Scientist zombie | Laboratory-style appearance | Easily separated by visual design | Unpredictable movement or attack behavior |
| Banker zombie | Formal or business-themed outfit | Recognizable among civilian-looking undead | Mixed enemy pressure |
| Sheriff zombie | Lawman-style equipment | Stronger visual connection to the frontier setting | Potentially dangerous ranged attacks |
| Skeleton | Exposed, bone-based frame | Looks fragile compared with armored enemies | Fast or repeated attacks |
Because the armored silhouette is the key identifier, players can recognize an Ironclad Zombie before it reaches weapon range. That early recognition creates a valuable choice: prepare a stronger weapon, establish cover, or route the train toward a safer position instead of committing to the fight immediately.
Recognizing the right enemy
Colorful clothing may distinguish a scientist or banker variant, while a firearm immediately signals an armed zombie. The Ironclad Zombie is defined by the quality and coverage of its protection. When the same visual cues are mixed with specialized enemies, players should pause and verify the target before consuming several rounds.
The sheriff zombie is another visual variant worth separating from it. Its frontier lawman imagery may resemble the Ironclad Zombie at a quick glance, but a lawman-themed enemy should be evaluated by its visible weapon and behavior rather than grouped with every zombie that carries equipment. A broader look at night enemies and sheriff bounties can help with that distinction.
According to the Dead Rails ironclad zombie gameplay video, the Ironclad Zombie encounter showcases the game’s undead enemy mechanics.
Special-event combinations
Full moons and blood moons can change which enemies appear, so a player should not assume that one successful strategy works for every night. A fast zombie forces accuracy, an armed zombie demands attention to incoming fire, and an Ironclad Zombie punishes insufficient weapon power. Meeting two of those threats together can be much harder than the sum of their separate encounters.
The Ironclad Zombie becomes especially valuable to identify because it changes firing priorities. Instead of quickly clearing the nearest target, the player may need to shoot the dangerous shooter first, reposition away from the armored zombie, and then return to it with a different weapon. Threat sequencing is often more important than choosing a single target at the start.
How to Fight the Dead Rails Ironclad Zombie Safely
A safe Ironclad Zombie encounter begins before the enemy reaches the train. The best defense is a position with limited entry angles, nearby cover, and a clear route back inside. Fighting in open ground removes all three advantages at once, while a fortified carriage or fort with turrets can turn a difficult pursuit into a controlled firing line.
A step-by-step defensive plan
| Step | Action | Reason |
|---|---|---|
| 1 | Listen and scan for movement | Night enemies can approach through exposed terrain |
| 2 | Identify the Ironclad Zombie | Its armor changes weapon priority |
| 3 | Create cover before the first shot | Standing in the open invites a surround |
| 4 | Target exposed areas | This reduces wasted ammunition |
| 5 | Reposition if melee enemies close in | One armored target can distract you from a faster threat |
| 6 | Retreat before reserves are exhausted | Ammunition is more valuable than one kill |
Fortification is the central recommendation in community reports. A train or fort safe zone with turrets allows the player to use controlled bursts, while the open desert offers little room to retreat. Even if the Ironclad Zombie itself is slow, the larger night encounter becomes dangerous when several enemies arrive at once.
Managing the train and the fight
Stopping is not always the best decision. A moving train can reduce the time available for attackers to surround the player, but stopping near a defensible fort can provide better cover. The practical answer depends on train condition, available defenses, and whether other objectives require immediate progress.
Do not stop in a wide-open area simply to fire one zombie. If you must stop, choose a location with a carriage wall between you and the approach, a stable firing position, and enough room to break contact. If the train lacks defenses, gather the party near an entry point and assign one player to watch for shooters while another handles the armored target.
The turret effect is particularly valuable because it can occupy a lane while the player reloads. It does not guarantee an instant kill against the Ironclad Zombie, yet it reduces the need to expose the entire party and can make an otherwise costly encounter manageable.
Ammunition discipline
Ammunition is the main resource that turns a long fight into a serious problem. The Ironclad Zombie may require more shots than a standard zombie, and a missed shot against moving armor is doubly expensive because it consumes both ammunition and time.
Reloading early can feel inefficient, but a ready weapon is more valuable than a perfect shot fired after the enemy reaches the carriage. Reloading behind cover is safer than exposing the whole team for a quick magazine change. When the train is fortified, alternate defenders can cover each other during reloads.
Players who want to improve their overall rail efficiency can also review the Dead Rails zombie class unlock guide. Unlocking a related class does not automatically solve an Ironclad Zombie encounter, but it may change the weapons, abilities, or role assignment available to the group.
Ironclad Zombie Spawn Conditions and Night Encounters
The available field data establishes a broad nighttime danger window but does not provide a confirmed spawn table for every Dead Rails Ironclad Zombie location. Hostiles begin around 11 PM and stop around 5 AM, and special moon phases can alter the enemy mix. Any claim that the Ironclad Zombie always appears on a specific route, moon, or night would go beyond the verified information.
This distinction is important for planning. Players know when the overall risk rises, but they should not treat a community observation as a guaranteed spawn schedule. Updates may change enemy frequency, and a route that feels safe on one playthrough may produce a different encounter on another.
Confirmed risk indicators
| Indicator | Confidence | What it changes |
|---|---|---|
| Hostile activity around 11 PM | Supported by community reports | Prepare defenses before the overnight window |
| Reduced activity around 5 AM | Supported by community reports | Reassess the route after dawn |
| Full-moon enemy changes | Supported by community reports | Expect a different mix of undead |
| Blood-moon pressure | Supported by community reports | Treat the night as a high-risk operation |
| Exact Ironclad Zombie locations | Not confirmed in the available data | Scout rather than relying on a fixed route |
Moon effects matter because they change the tactical plan, not merely the scenery. A player preparing for a standard zombie night may carry only cheap ammunition, while a full-moon night justifies stronger weapons, extra reserves, and more careful use of fortified stops.
Prepare before darkness
Preparation should happen before the hostile window begins. Check the train’s weapons, repair damaged defenses, and make sure every player understands which openings are being watched. If the group can spare the supplies, carrying one heavier weapon specifically for armored targets prevents everyone from relying on an inefficient loadout.
Timing also matters. Waiting until multiple enemies are already near the train can force a bad engagement, especially when an armed zombie is firing from one side while the armored enemy advances from another. A short, deliberate defense is preferable to a scattered fight in the desert.
If a retreat becomes necessary, do it in an orderly way. One player maintains suppression, another escorts less mobile teammates, and the armored enemy is handled only when it no longer threatens the group. This is particularly important when a fortified carriage is the only safe point available.
Advanced Ironclad Zombie Tactics for Difficult Routes
Harder routes reward preparation and role discipline. The Ironclad Zombie becomes easier to manage when the group divides responsibilities, preserves a fallback weapon, and uses the environment to limit angles of attack. The objective is not to force a dramatic one-on-one duel in open terrain; it is to make each shot efficient and each retreat predictable.
Build roles before the night arrives
Weapons should be distributed rather than left with one carrier. A group with a powerful rifle, a close-range option, and a spare firearm can switch roles when the Ironclad Zombie enters range. If everyone uses the same weapon, a single weakness can affect the entire defense.
Ammunition needs at least one reserve plan. Community reports consistently treat the train’s limited resources as a meaningful constraint, and that becomes more important against armor. Divide reserve rounds across the group, then designate a player who remains with the secondary weapon instead of chasing the armored target.
Positions should have separate roles. One defender can cover the closest approach, another watches for armed zombies, and a third concentrates on the Ironclad Zombie. This prevents the armored enemy from being used as visual cover for more dangerous attackers.
Exploit the armored target’s predictability
The Ironclad Zombie is slow, which gives the player time to react but also encourages a careless rhythm of repeated shots. Instead, wait until it reaches a predictable angle, expose the upper body, and commit a measured burst. A deliberate burst is often more efficient than continuous fire that empties a magazine while the target is still covered.
Target transfer matters when another threat arrives. A fast zombie or an armed zombie can demand immediate attention, so do not keep aiming at armor simply because that was the original target. Let a teammate cover the armored approach, deal with the immediate danger, and resume the attack once the lane is clear.
Terrain and route selection
Route selection can prevent the encounter entirely. Communities emphasize that fighting in the open is worse than using a fortified carriage or fort because the desert removes both cover and retreat space. If the train can reach a defensible location before 11 PM, doing so may be more valuable than the extra distance gained by pushing onward.
A shorter route can be safer when the group lacks ammunition, because a weak but controlled defense takes less total damage than a long pursuit across exposed terrain. Conversely, a well-supplied group with a strong firearm may prefer distance to avoid investing resources in a temporary stop. The best decision depends on the current train condition, available weapon power, and number of players, not on a universal rule.
Know when the target is not worth the chase
An Ironclad Zombie can be ignored only when the train can reach safety before it catches up and the group can still reach the next objective. Abandoning a kill in open desert is sensible if doing so prevents a train wipe. The cost of ammunition, teammate health, and route progress is often more consequential than the zombie’s possible reward.
Target priority is a resource decision. The objective is not to defeat every enemy; it is to preserve the group’s ability to continue the run. When the numbers favor retreat, use cover, move the train, and reassess from a defensible position.
Dead Rails Ironclad Zombie: Final Combat Checklist
The Dead Rails Ironclad Zombie rewards preparation because its armor makes inaccurate attacks unusually expensive. The core strategy is to recognize it early, create a firing position, concentrate damage on exposed areas, and preserve enough ammunition to deal with whatever else appears at night.
| Preparation | Fight | Retreat threshold |
|---|---|---|
| Bring a strong weapon | Aim for uncovered areas | Ammunition is nearly gone |
| Carry a backup option | Keep one defender on other threats | Multiple enemies reach the carriage |
| Fortify the train | Use controlled bursts | The train can no longer move safely |
| Watch the clock | Expect greater danger after 11 PM | The route remains exposed at dawn |
| Identify special variants | Transfer fire when priorities change | Fighting would risk the entire run |
The most important takeaway is that armor is the Ironclad Zombie’s defining trait, not a minor visual detail. A player who understands how that protection changes weapon efficiency will waste fewer rounds, react earlier to an approaching armored silhouette, and preserve the group when the nighttime encounter expands beyond one enemy.
Frequently Asked Questions
What is the best weapon against the Dead Rails Ironclad Zombie?
A high-power firearm with accurate aim is the most practical general answer because the Ironclad Zombie’s armor reduces the value of weaker attacks. The available community data does not specify one exact best gun, so choose a weapon you can use consistently, aim at exposed areas, and pair it with a reliable secondary option.
Does armor make the Dead Rails Ironclad Zombie immune to damage?
No. The Ironclad Zombie takes damage, but protective equipment makes some hits less efficient, especially when rounds strike covered areas. A precise shot to an exposed section or a stronger weapon can still remove it quickly, although wasting ammunition on the center of its armor is risky.
When do hostile enemies appear in Dead Rails?
Community field notes place the main hostile period around 11 PM through approximately 5 AM. Full moons and blood moons can add special enemy types or increase pressure, so prepare before darkness and avoid relying on a fixed route that may produce a different encounter after an update.
Are the armed, miner, scientist, banker, and sheriff zombies the same as the Ironclad Zombie?
No, although all belong to the game’s undead enemy variety. The armed zombie carries a firearm, while the miner, scientist, banker, and sheriff zombies use distinct visual themes. The Ironclad Zombie is defined by heavy protective equipment, which changes damage efficiency and requires a different tactical response.
Should players chase a Dead Rails Ironclad Zombie across open ground?
Usually not. Open terrain removes cover and retreat space, while community reports favor fortified carriages and forts for safer defense. If the armored enemy catches the group far from protection, it can be smarter to preserve health and ammunition, move toward safety, and engage only when conditions improve.